Lanyard-mountable LED throwies
Posted: May 25, 2014 Filed under: DIY, Explorations, How-to, That Totally Worked, Uncategorized | Tags: blinky, DIY, glow, glowy, invention, inventions, LED, LEDs, light, throwies, toys Leave a commentAt the last “HacKidThon”, we showed a passel of kids how to make LED “throwies”. Each one is a nothing more than an LED, a coin cell battery, and a magnet so the contraption can stick to metal surfaces, walls and buildings, and hang there glowing.
This week, someone asked me if we could modify the classic design somehow so that the LEDs could be attached to lanyards, instead of magnets. We wanted it to be as cheap and easy as the rest of the “throwie” recipe.
A little brainstorming with Eleanor, and we came up with this: plastic-coated paperclips!
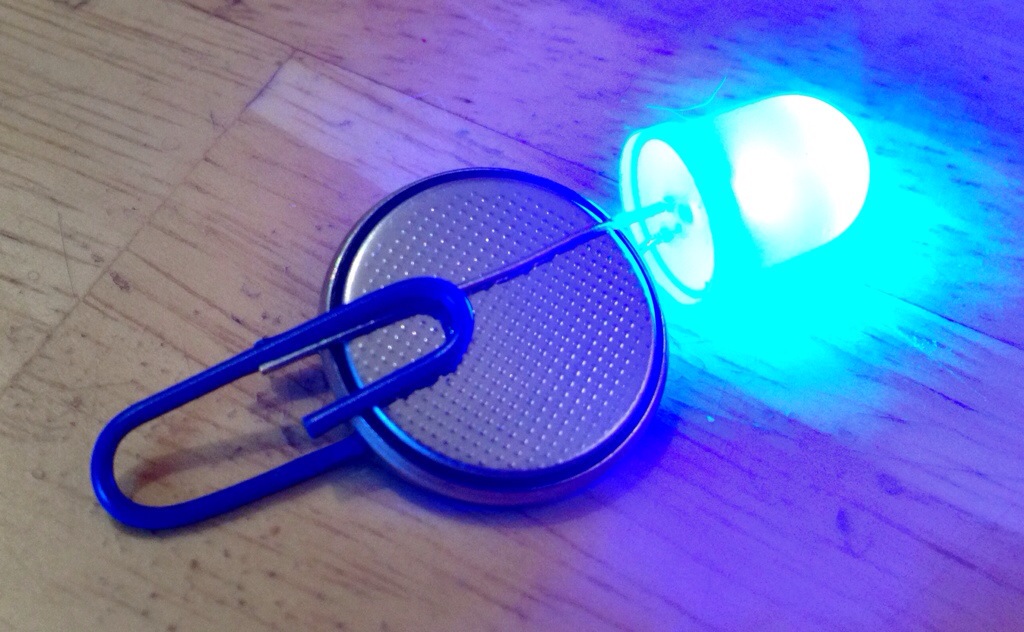
The paperclips actually help hold the LED leads in place; we put tape around them as usual, though that’s not shown in the picture. The plastic coating keeps the paperclip from shorting out the positive and negative battery terminals.
The coated paperclips cost less than a penny apiece, and come in colors that match the LEDs. Victory!
Easter Egg Hunt Rules, 2014.
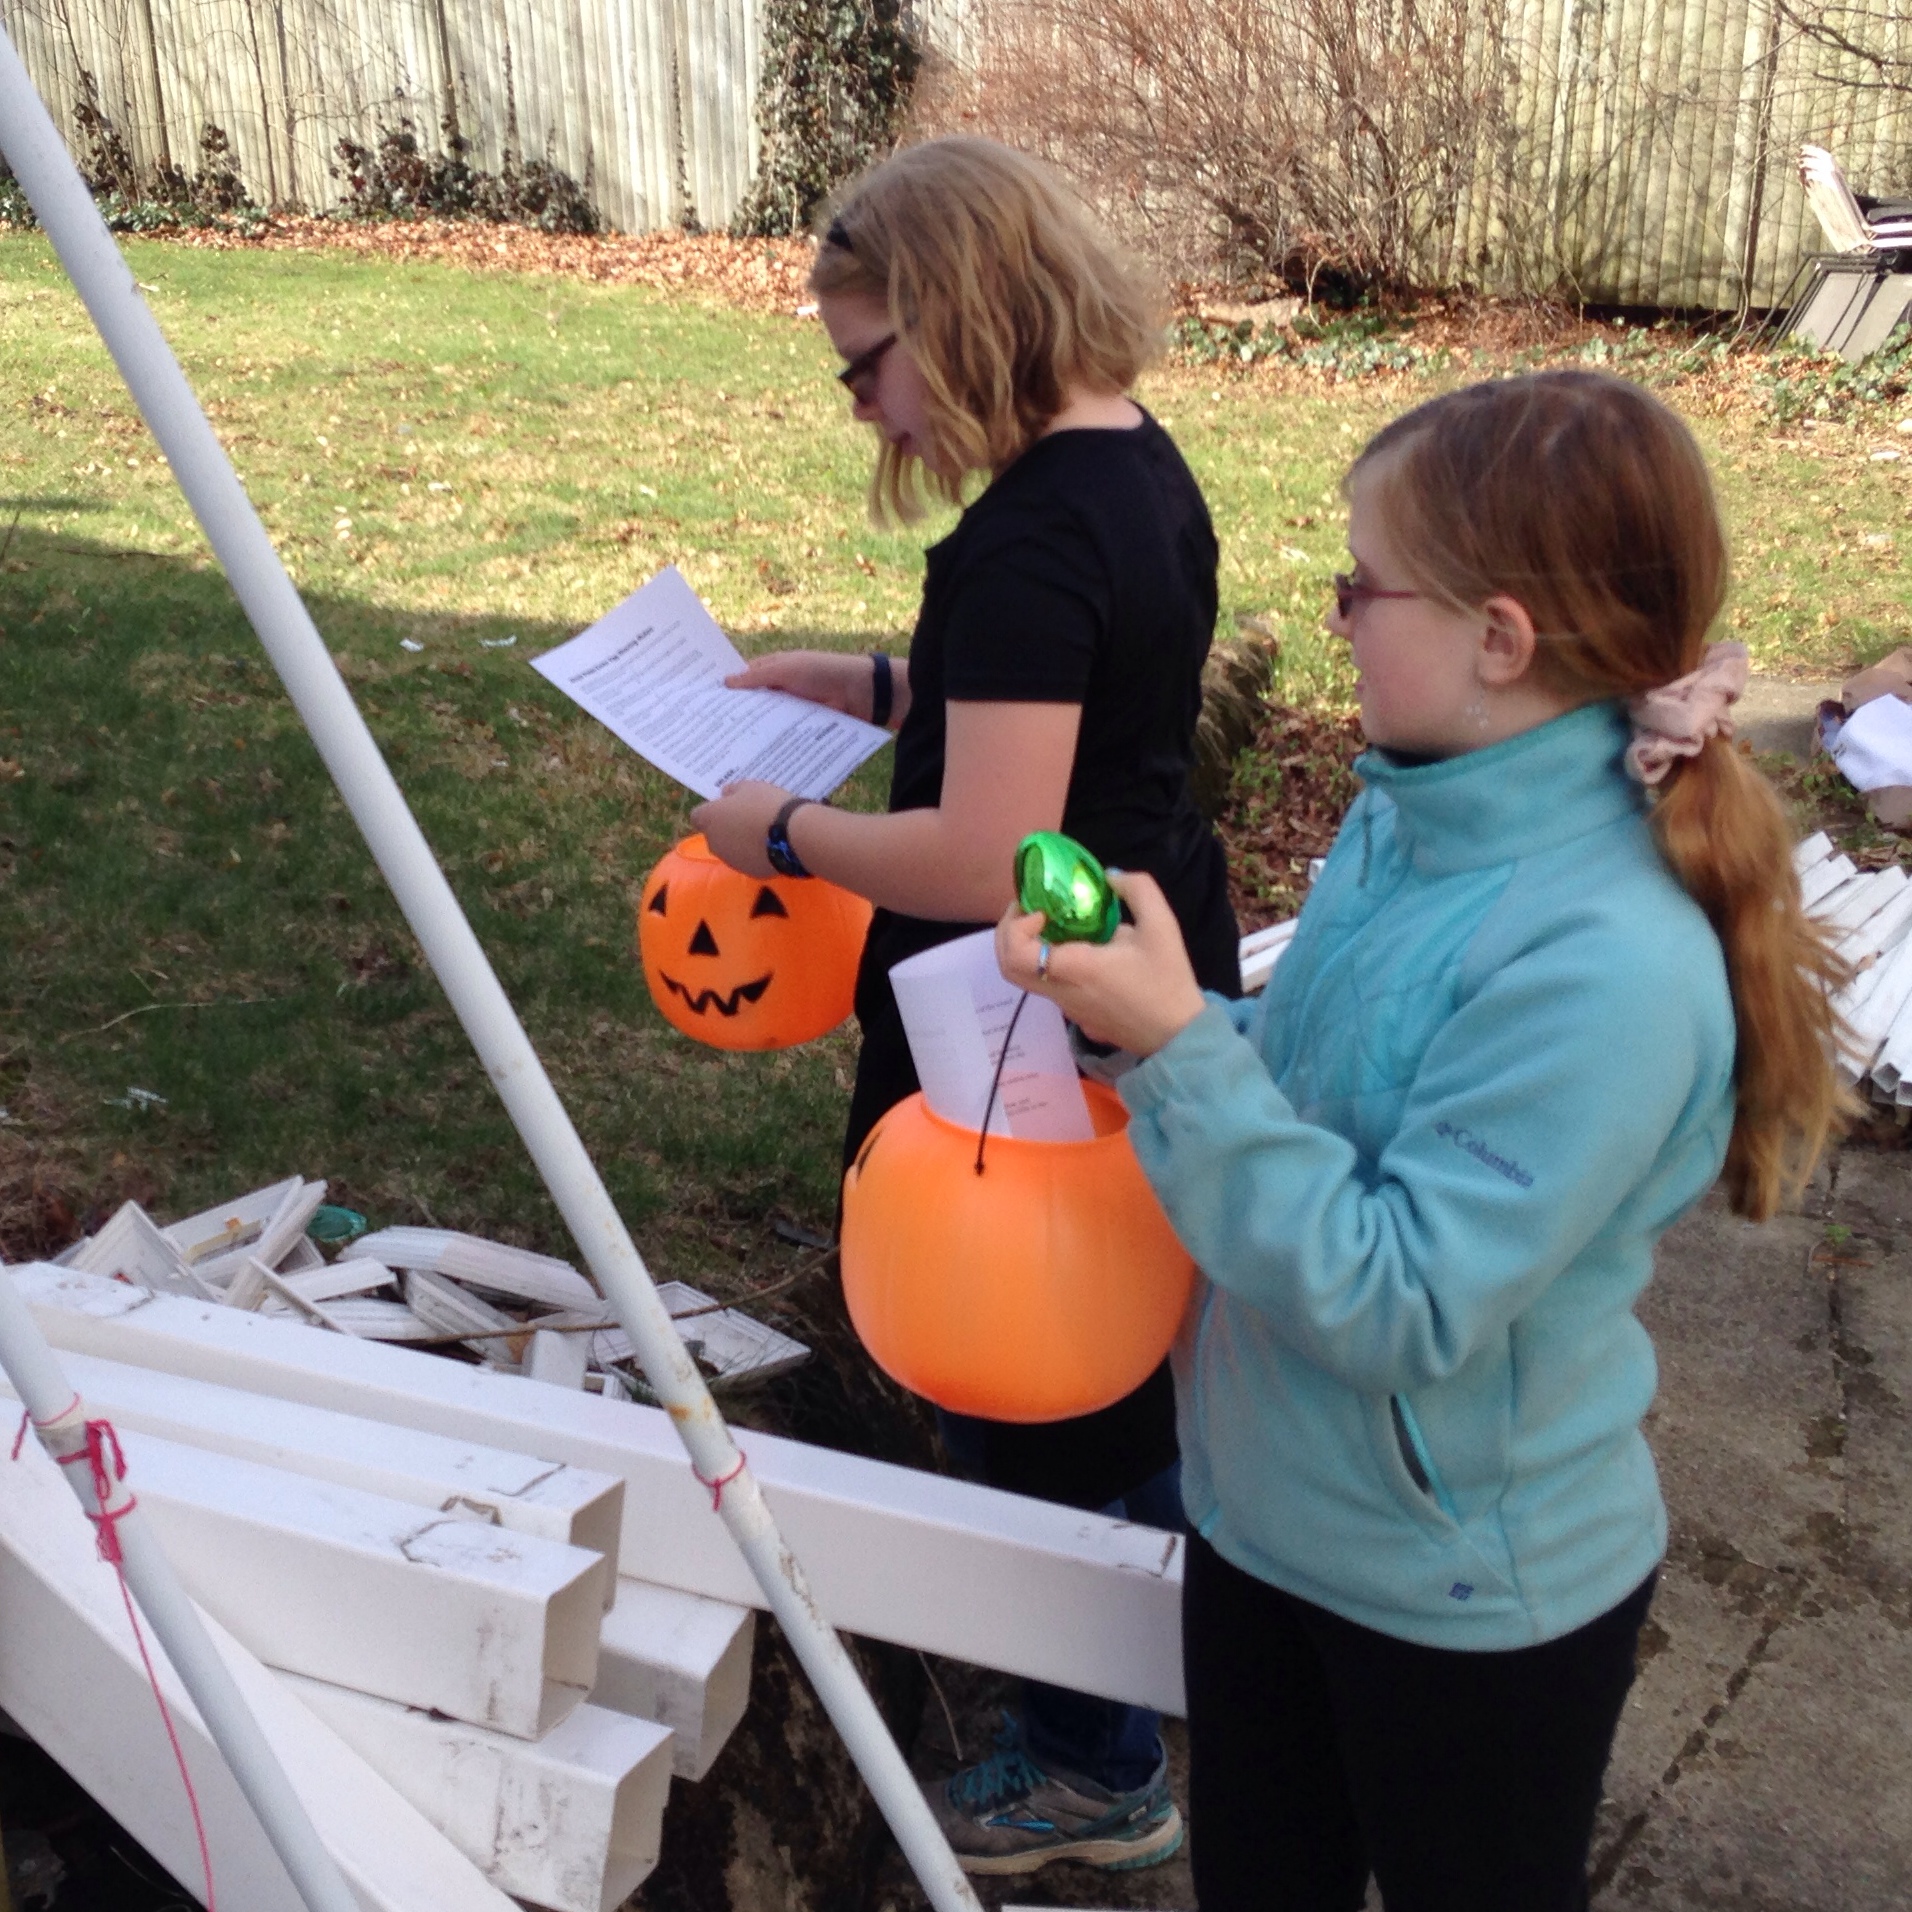
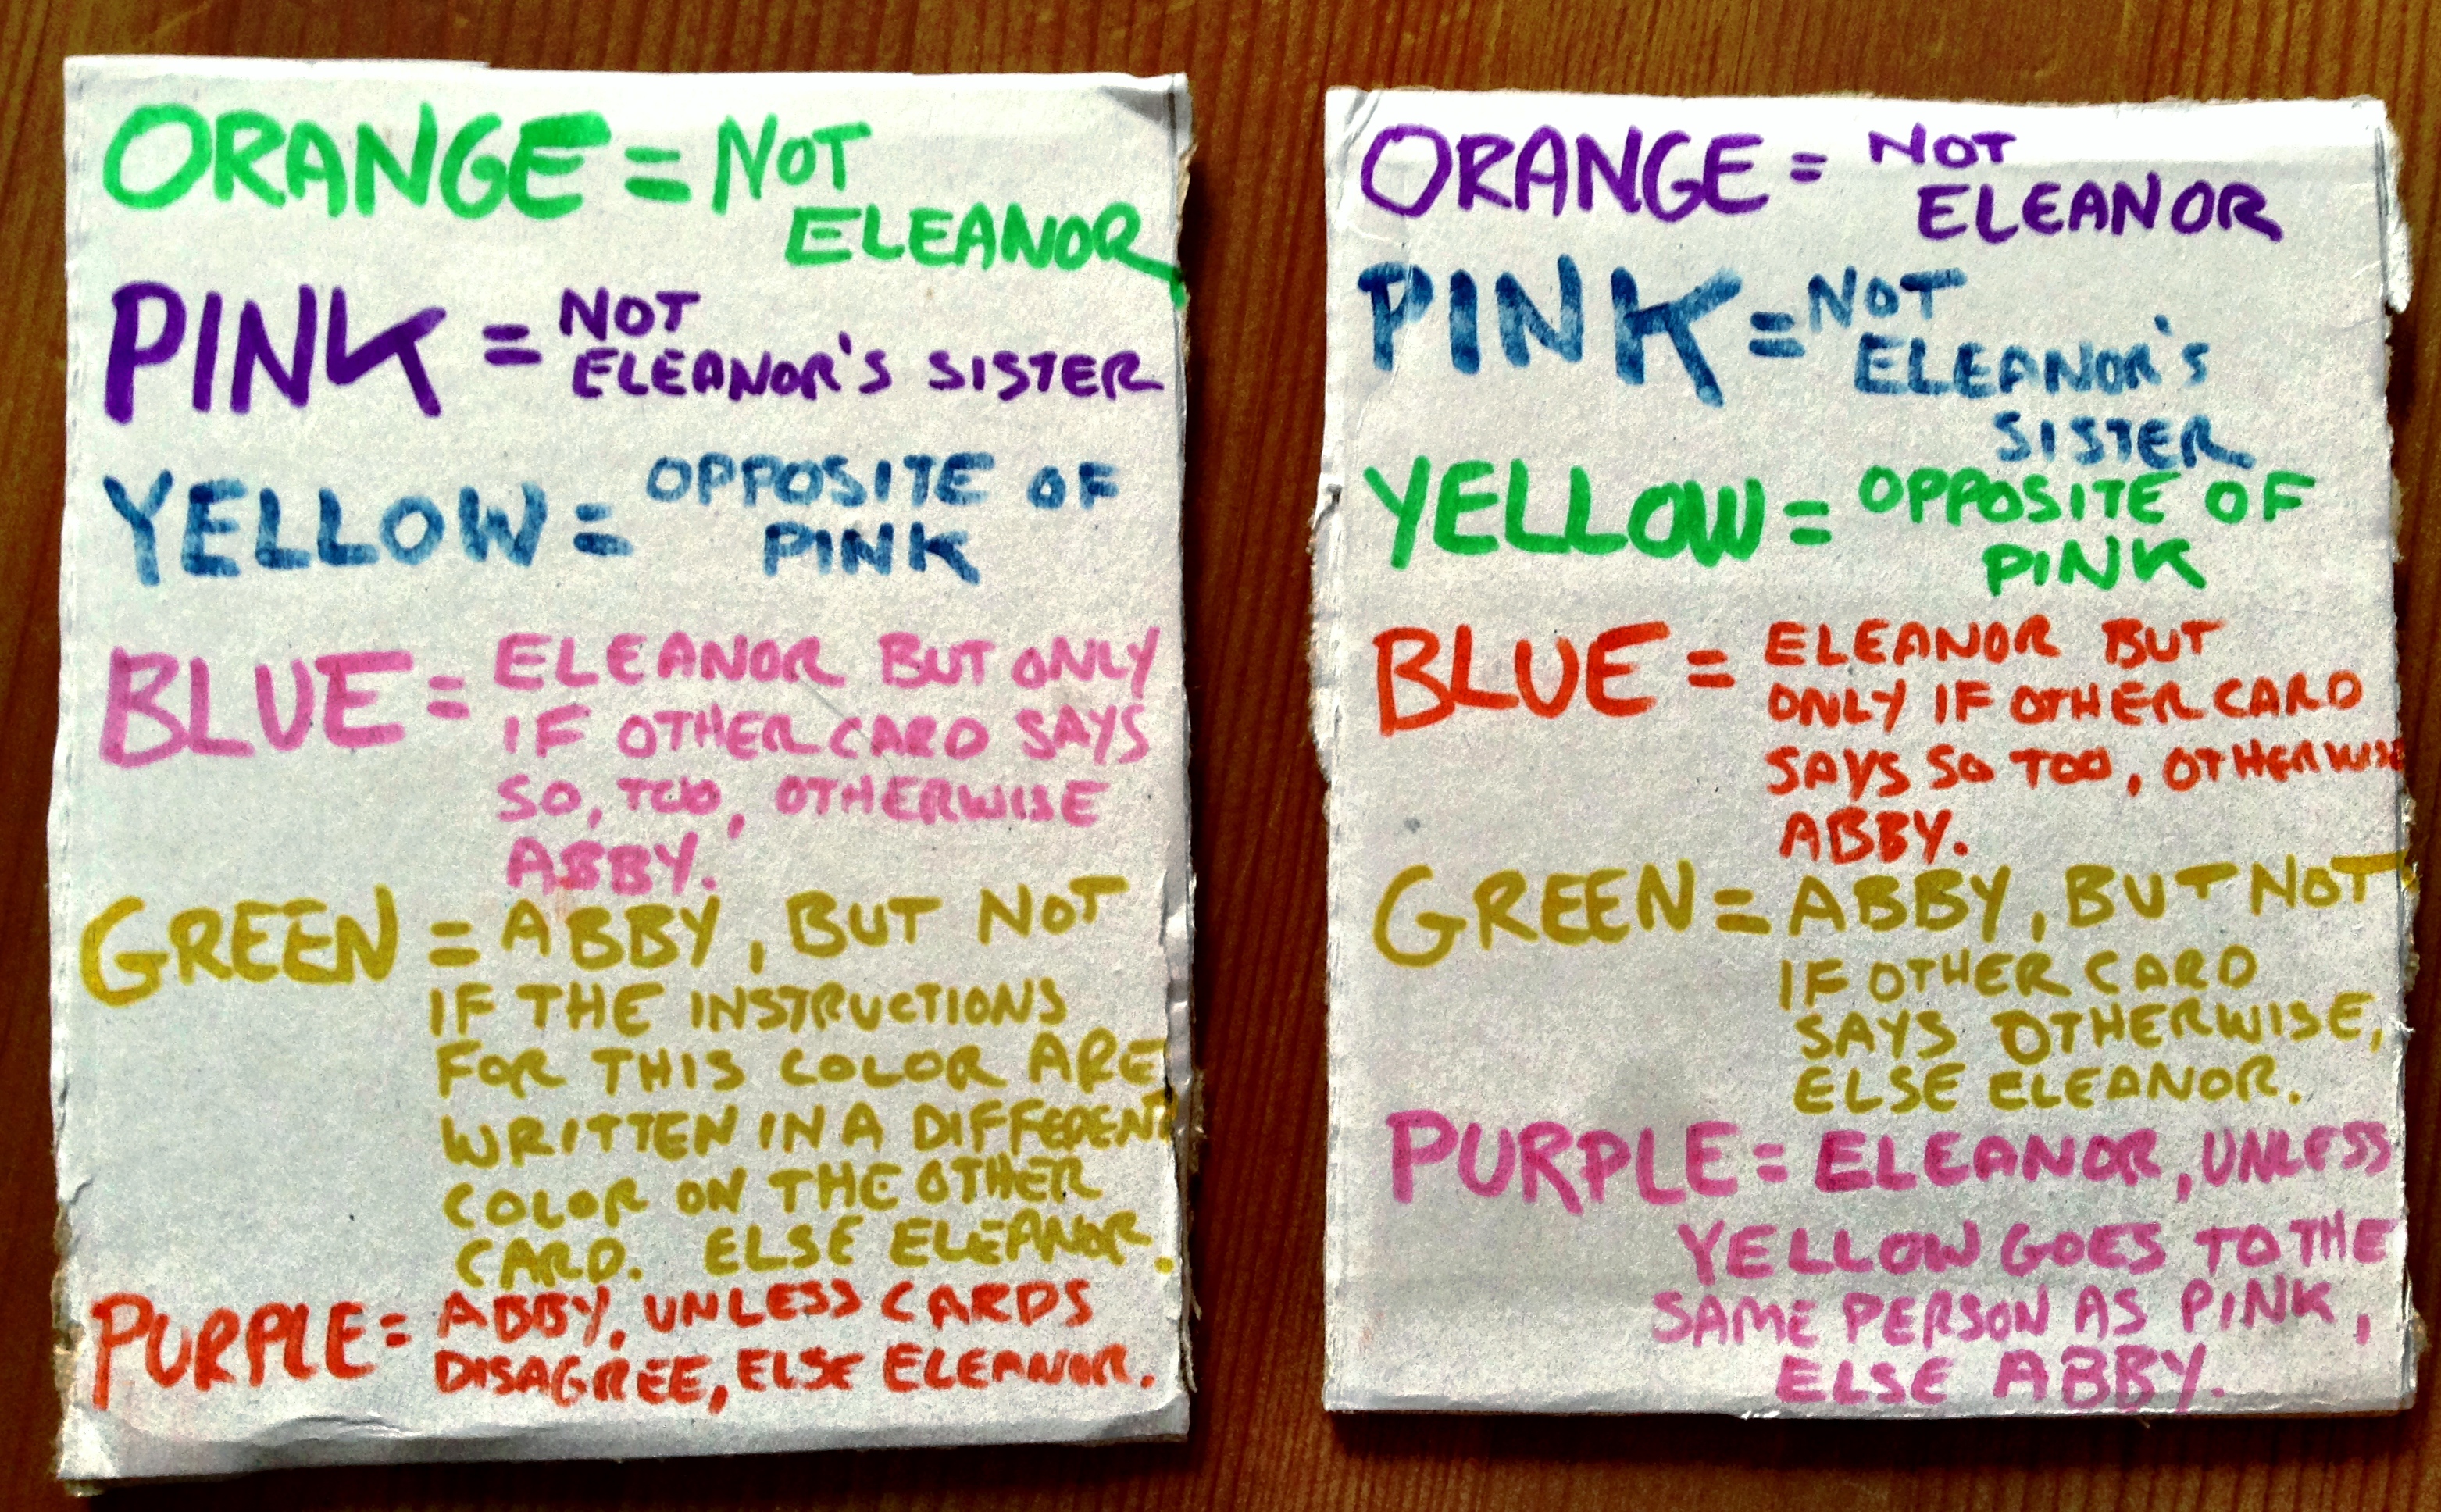
Posted: April 21, 2014 Filed under: Coding, Explorations, Getting A Clue, That Totally Worked | Tags: Easter, easter egg hunt, easter eggs, puzzle, puzzle hunt, puzzles, rules 5 CommentsWe love doing Easter egg hunts. But as the girls get faster, smarter, and more wily, merely finding the eggs is no longer challenge enough. I’ve gotta slow ’em down somehow, and this is how I do it: each girl gets an empty basket (I use traditional Jack-O-Lantern baskets), and sheet of instructions helping her know which eggs are for her, and which are for her step-sister. Each year, the instructions require more careful reading and invoke increasingly complicated rules.
New this year: the contents of two of the eggs altered the interpretation of rules, retroactively. This fact itself was part of the published rules… this time.
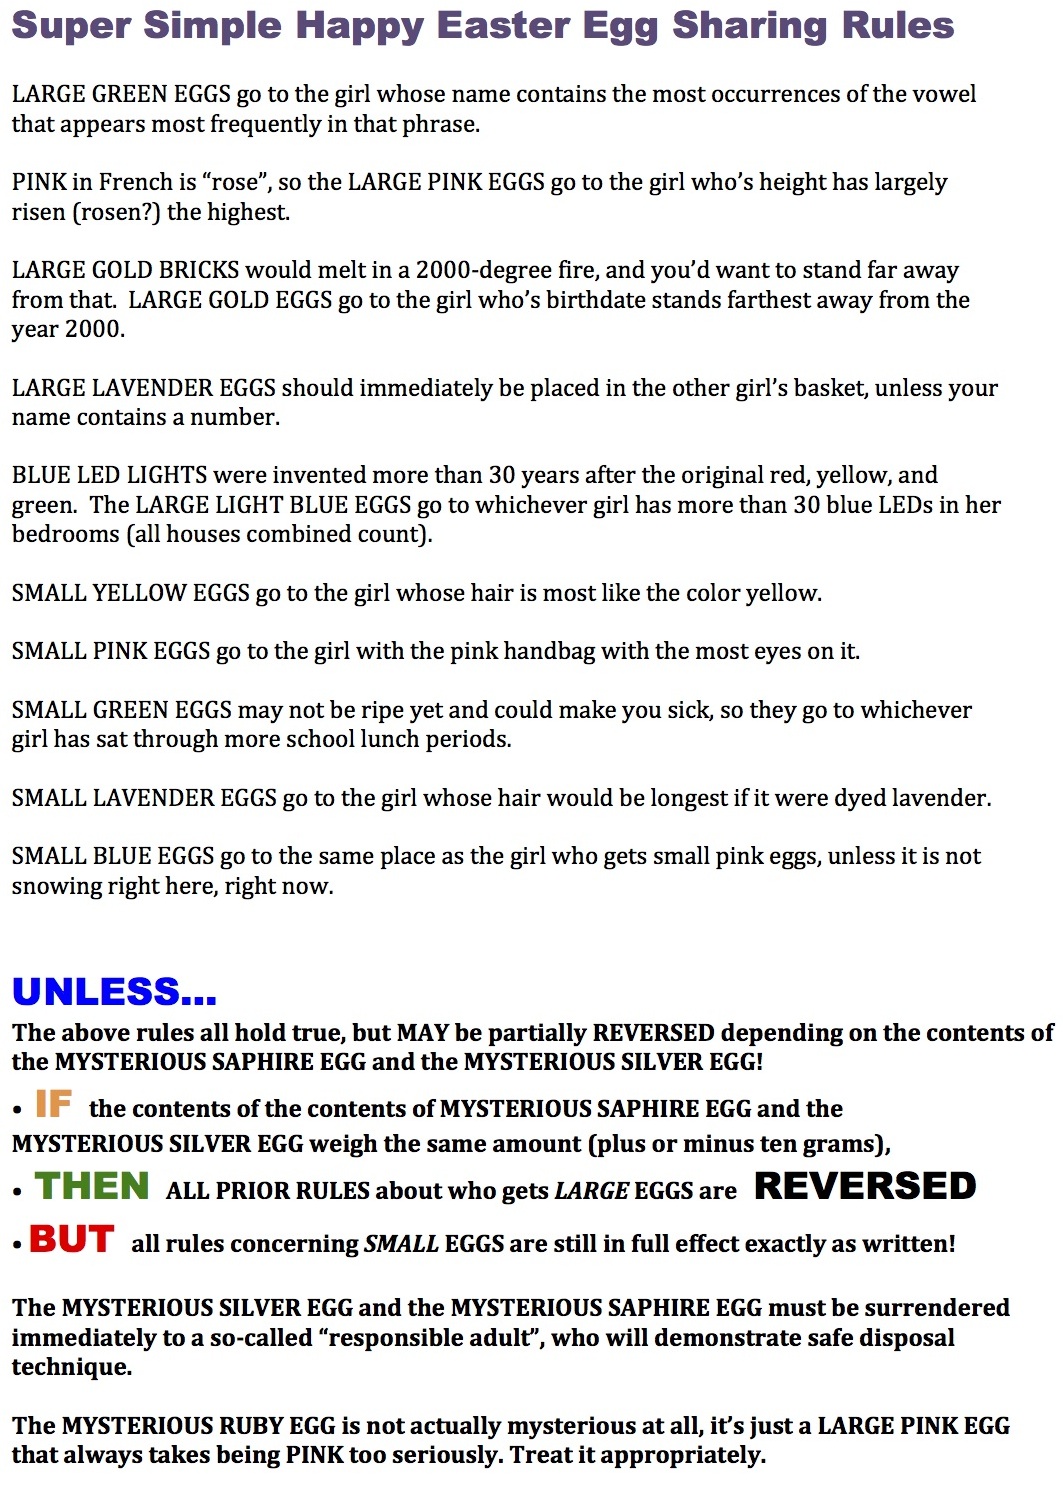
The best part was watching the girls excitedly pounce as they found the first eggs, and then stall completely as they had to stop and puzzle out exactly who’s egg it actually was that they’d just found.
-Mark
P.S. Here are the previous year’s Egg Hunt Rules (2013):
Fire2012: an open source fire simulation for Arduino and LEDs
Posted: April 4, 2014 Filed under: Art, Coding, Creations, DIY, Explorations, How-to, That Totally Worked | Tags: arduino, art, blinky, DIY, fastled, fiery, fire, glow, glowy, LED, LEDs, light 3 CommentsI’ve built and programmed a couple of different ‘fire’ simulations for Arduino and LEDs, and I’ve had numerous requests over the years to share the source code. I’ve always been happy to share my work; the holdup has been that before I share my code for the world to peer at, I like to clean it up a little. I like to give the code a clean shave and scrub under its fingernails before it steps out onto the wide open Internet where it might have an audience with Her Royal Majesty, The Queen of England. It could happen.
Anyway, I finally cleaned up the code for one of my simplest and most legible ‘fire’ simulations, and I give it to you, your Majesty, and everyone else, too. Here’s a video of the code in action on a 30-pixel strip of WS2812B LEDs (or maybe WS2811) and an Arduino. Source code link is below the video.
Full source code is here: http://pastebin.com/xYEpxqgq The simulation itself is only about 25 or 30 lines of code. It uses our (open source) FastLED library to drive the LEDs.
Discussion about the code and how to port it and use it are here on the FastLED discussion group on G+ https://plus.google.com/112916219338292742137/posts/BZhXE4cqEN4
Enjoy!
-Mark
If I’m confused, it must be playtime.
Posted: March 20, 2014 Filed under: Art, Coding, Creations, Explorations, Reflections, So that didn't work, That Totally Worked | Tags: arduino, fastled, learning, LED, LEDs, play Leave a commentSome things we try because we have a clear idea where we want to be and a clear idea how to get there.
Some things we try because we’re suddenly shocked to find that the heretofore completely impossible has suddenly and surprisingly come within practical reach.
And some things we try just to play, and to explore what if. We start with our heads full of simple ideas that turn out to be wrong, and we awkwardly replace them in torn out bunches with new confused half-understandings that, later, will let us reach something wholly unexpected.
I’m not sure which of these things in doing here, which means it’s probably that last one.

Hoop skirt — made with real hoops!
Posted: October 15, 2013 Filed under: Art, Creations, DIY, Explorations, How-to, That Totally Worked | Tags: costume, costuming, dress, duct tape, eak, eleanor, hoop, hoop skirt, hula hoops, skirt Leave a commentEleanor and I spent this weekend working on her Halloween costume. Part of what she planned was a ‘hoop skirt’, but as you can imagine no commercially available hoop skirt met her exacting standards of design and quality — and also my exacting budgetary requirements. Naturally, we decided to take the DIY route! And, we pondered, what goes into a hoop skirt? HOOPS, obviously!
We picked up a used dress at The Garment District (our local vintage/costume/cheapo clothing mecca), a set of three hula-hoops, and some leopard-print duct tape. The smallest hula hoop became the bottom (largest) hoop for the skirt; the other two had to be dramatically resized smaller (via pliers, dremel, duct tape). We started construction from the waist down, with a nylon web belt with a parachute snap buckle. From there, we hung each hoop with repositionable blue painters tape, and balanced each one until it was level. Then Eleanor secured each hoop in place at the right height with duct tape.
And presto! A hoop skirt made with real hoops! (and duct tape, of course!)

“Firelight” Lantern
Posted: February 11, 2013 Filed under: Art, Creations, Explorations, That Totally Worked | Tags: art, fire, flame, flames, lantern, LED, LEDs, light, lights Leave a commentThis past January (2013), I created “Firelight”, a lantern that shines with the light of a simulated fire.
The lantern contains over a hundred LEDs, a microcontroller, a battery pack, and custom software. The software monitors the remaining power in the batteries, and as the voltage slowly runs down, the flames burn lower, finally dying into embers as the batteries die.
I presented the Firelight lantern at the Veracode winter Hackathon, where I lit it, and then gently blew on the coals to kindle a flame. I’ve had a few requests to build more of these lanterns for other people, and I’m considering it, but haven’t made a decision yet. More pictures are here.
-Mark
The Lightning Tree: Halloween
Posted: November 1, 2012 Filed under: Creations, Explorations, That Totally Worked | Tags: arduino, art, blinky, DIY, fastspi, fastspiled, Halloween, LED, LEDs, light, TLT Leave a commentOver this past summer, I built “The Lightning Tree” — a 13-foot-tall steel and aluminum tree covered in hundreds of programmable LEDs. Normally, The Lightning Tree slowly cycles through animations depicting the different seasons of the year, but for Halloween I reprogrammed it full of wild purples and oranges, and planted it in our front yard!
It attracted and delighted kids and grown-ups throughout Halloween night, but the time the sun rose, it had disappeared, like all things ephemeral and magic. (To be clear: it disappeared in a good way, as Black Rock City does.)
Travel Tips for Venturing OUT of Black Rock City
Posted: September 3, 2012 Filed under: Explorations, How-to, Pearls of Folksy Wisdom | Tags: black rock city, burning man, clothes, clothing, default world, exit greeters, fire, money, travel, wall country 2 CommentsSo! You’ve decided to take a trip away from Black Rock City! Here are some tips to keep in mind when traveling away from Home:
Clothing: Make sure to bring enough clothes so that everyone in your group can have some. Among other things, will save you all time later since you won’t have to keep switching.


Money: Do you remember when you were a child, collecting bits of money here and there, slowly saving up for that one thing you really wanted? Well, money here works the same way, except that you may have to break open your piggy bank a little bit more often. If it helps, think of every shop, store, restaurant, gas station, bar, and mall that you see as if they were “Arctica”, and what they’re all selling is basically just ice: cool, and maybe useful, but ultimately fleeting and ephemeral. ‘Nuff said.


Bacon: BACON IS EXACTLY THE SAME EVERYWHERE, THANK $%!*&@# GOD.
Returning Home After Your Trip: After you’ve had an exciting jaunt out and about, it’s always good to come back Home, to be with your family and your loved ones. Have a wonderful trip, and we’ll see you when you get Home again.
Yours in flame-
-Mark
“Five Elements” light sculpture
Posted: July 3, 2012 Filed under: Creations, DIY, Explorations, That Totally Worked | Tags: arduino, blinky, creations, decor, DIY, glow, glowy, LED, LEDs, light, RGB, sculpture 3 CommentsAfter months of work, “Five Elements”, my first full light sculpture debuted this weekend at a private event. This quick video shows a short clip of each ‘element’; the actual five-element cycle is 12 minutes long, repeating each of the five elements five times each hour. As with any “version 1.0”, I have a dozen ways I’d like to polish and keep improving it, but I’m happy with it as is, too.
It’s illuminated by 150 RGB LEDs and controlled by an Arduino Uno using the FastSPI_LED library and my own custom code.
The installation at the debut event used a very different diffuser which made the LEDs more visible. While both were good, I think I prefer this diffuser overall.
Small Scale Solar power presentation
Posted: May 1, 2012 Filed under: DIY, Explorations, That Totally Worked | Tags: 12V, blinky, DIY, electricity, glow, glowy, light, off-grid, power, repair, solar, solar cell, solar cells, solar panel, solar panels 1 CommentI gave a “learning lunch” presentation on Small Scale Solar power today. We had a great audience, got great questions, and had fun doing it — despite the definite lack of sunshine to play with today.
The Short Version is this:
- Hook a solar panel to a charge controller to a battery. (There are starter kits with everything.)
- Presto: 12 Volt DC power!
- Use your newfound power as-is, or step down to 5v USB, or up to 120VAC using an inverter.
The slides don’t tell the whole story by themselves; that requires my own personal song and dance routine. Nevertheless, here they are, with “lite” graphics for fast download: PDF.
