Easter Egg Hunt 2016.
Posted: March 27, 2016 Filed under: DIY, Explorations, That Totally Worked | Tags: code, codes, CTF, cypher, cyphers, Easter, easter egg hunt, easter eggs, emoji, puzzle, puzzle hunt, puzzles, QR code, QR codes, rules 1 CommentWe’ve always loved Easter egg hunts, but with the girls getting smarter, faster, and more wily every year, we’ve had to make the hunt more… challenging. Our previous Easter egg hunt had infuriatingly complex rules as to which girl got which color of egg. But with the girls in middle school now — actual teenagers — I knew that I was going to have to step up my game if I wanted the hunt to last more than just a few minutes. Inspired by some of my puzzle-crafting Veracode coworkers, I put together our 2016 Easter Egg Hunt. Here’s how it went.
Step 1. Read the rules.
Once again, Eleanor and Abby were each given a sheet of paper indicating which colors of eggs they should each pick up. Here are the ‘rules’ they were given for this year’s egg hunt:

After a few false starts, the girls cracked the emoji substitution cypher. Since some symbols like🌀 and 👻 appeared only once on the page, it took some thinking to decode the whole set of color rules, but working together they did it.

Step 2. Find the eggs.
List of colors in hand, they ran outside to start finding the eggs hidden around the back yard. Each girl found all of their eggs within about ten minutes; finding the eggs themselves isn’t too terribly difficult — which is why we got into all these rules and colors and puzzles in the first place.
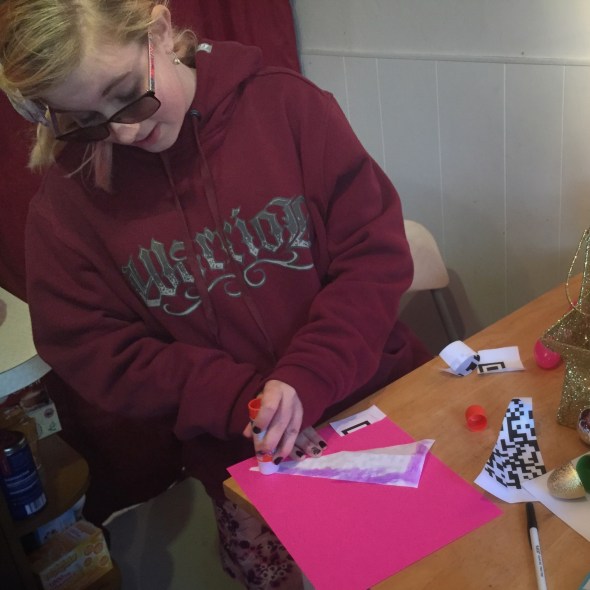
Step 3. Open the eggs… and wait, what’s this?
Once back inside, the girls opened the plastic Easter eggs… but wait! Where’s the loot?!? Instead of treats or trinkets, each egg held one small, oddly-shaped piece of paper with black and white squares on it: a QR code, cut into puzzle pieces.

Working quickly, the girls each assembled the pieces of their respective QR code puzzles. One went together easily, the other took some collaboration and a couple of different attempts before it all came together.
Step 4. Follow the clues.
Each girl’s QR code was different, and scanning the re-assembled QR codes led to two different URLs: two different tweets, by two different people (neither was me). Each tweet had a picture and a big clue about a different location around our house.

Step 5. Victory!
Eleanor dug down into our pile of birdhouses (why we have a pile of birdhouses is a long story for another day), and Abby popped open the lid of the grill. Each girl found a set of colored ‘crystal’ eggs — filled with sweet, sweet victory loot!
In just under 45 minutes, the girls had cracked a cypher, found the hidden Easter eggs, reassembled the QR code puzzles, and followed the twitter URL picture clues to find their well-deserved treasure. The chocolate was sweet, but from the looks on their faces, I think the taste of victory was even sweeter.

Now about next year…
First light – five years later
Posted: March 25, 2016 Filed under: Art, DIY, Explorations, Getting A Clue, Pearls of Folksy Wisdom, Reflections, That Totally Worked | Tags: art, blinky, fastled, journey, learning, LEDs, light Leave a commentFive years ago today I got my very first piece of LED art gear to light up for the very first time.
It was a Color Kinetics panel that you sent data to over ethernet, not an addressable LED strip & embedded microcontroller coding situation at all. The panel itself previously belonged to an LED art pioneer, “Frostbyte”, who had taken it with him on his desert adventures before his untimely and accidental demise. His old electronic gear was auctioned for charity, and without really knowing what I was getting in to, I bought this massive (28 pound!) metal box with 144 RGB LEDs in it, and the network controller to match.

I could find no open source software to drive it, and owning the commercial sequencing/design package was out of my reach. For three years, the panel sat in my workroom idle and dark. But at some point, I found that the vendor had a simple free “test program” available, and I decided to see what I could do. Since the color data was sent from the test program to the panel over ethernet, I was able to capture the network packets, reverse engineer them, write my own code to talk directly to the LED panel, and TA-DA! First light!
But even with that one LED panel up and running, more than a year passed before I started learning how to use addressible LED strips and Arduino microcontrollers. Another year after that, I had officially become ‘part of’ FastLED with Daniel Garcia.
And now? Now I’ve created LED art myself, taken it on my adventures– desert and elsewhere, sold it and gifted it. I’ve taught LED classes, and I’ve helped build an online community for thousands of FastLED users. I’m not sure what I expected when I first bought that LED panel, but I don’t think it was all this great stuff.
So if there’s a lesson here, it might be this: If something intrigues you, step toward it. You never know exactly where you’ll wind up, but the journey will be an adventure in the right direction.
