FastLED for the Apple II: Hack to the Future!
Posted: February 16, 2015 Filed under: Art, Coding, Creations, DIY, Explorations, That Totally Worked, Uncategorized | Tags: APA102, Apple, Apple //e, Apple II, AppleII, arduino, art, blinky, CALL -151, DIY, DotStar, fastled, glow, glowy, LED, LEDs, light, LPD8806, retrocomputing, WS2801 6 CommentsThese days, I hack LEDs. I’m the co-author (with Daniel Garcia) of the FastLED library for driving tons of high speed LED pixels and strips using microcontrollers like Arduino and Teensy.
But back in the day, I hacked a lot of Apple II. I published a couple of shoot-em-up games (with Geoffrey Engelstein), all written in lovingly hand-crafted 6502 assembly language.
Finally I decided it was time to link the present to the past: to connect a hundred high-speed RGB LEDs to an Apple II, somehow, and ‘port’ our FastLED library to 6502 assembly language.
Well, I did it, and it works. My new creation, “FastLED6502”, can drive a hundred 24-bit RGB pixels at more than 30 frames per second from an Apple //e :
The Details
Here are the details of “FastLED6502”:
- “FastLED6502” is a lightweight port of FastLED’s core functions to 6502 assembly language for the Apple ][, Apple ][+, Apple //e, and Apple //gs.
- Supports APA102 / Adafruit DotStar LED strips, as well as LPD8806 and WS2801 (though those two are not fully tested yet).
- The LED strip is connected to the Apple II using the 16-pin DIP game port on the computer’s motherboard. The 9-pin DB joystick/mouse port on the back of the //c, //c+, and //gs cannot be used, as it lacks the TTL digital output signals needed to drive the LED strip.
- 24-bit FastLED Rainbow colors are included, along with FillRainbow, Random8 and a number of other useful functions from FastLED’s main library.
- Everything had to be re-written from scratch in 6502 assembly language. Luckily(?), I still remember how to do that.
- The assembly code knows the binary serial protocols for the APA102 (Adafruit DotStar), LPD8806, and WS2801 LED driver chips. Depending on which one you select, FastLED6502 transmits the LED colors in the correct protocol over the game port TTL digital output lines.
-
Considering that the Apple II sports a 1MHz 6502 so slow that even a “NOP” takestwo cycles, overall performance is pretty good: more than 30 frames per second for a 100-pixel strip.
-
Speaking of speed, or lack thereof, “three-wire” clockless LED strips such as the WS2811 NeoPixel are not supported now, nor will they ever be. The CPU is would need to be at least 20X faster to support them, and it isn’t. For that you want an Arduino or Teensy, and FastLED proper: http://fastled.io/

FastLED6502 at Veracode Hackathon 7
How’s it work?
So how does this all work? Well, you connect the CLOCK and DATA_IN pins from the LED strip to a couple of pins on your Apple II’s DIP game connector port, add power, and you’re ready to go. The Apple II’s game connector not only has inputs for joysticks, paddles, buttons, and so on, but it also has a few digital outputs — and that’s what FastLED6502 uses to deliver signals to the LED strip. On all the 16-pin DIP Apple II game ports (except for the //gs!), there’s even one pin that delivers a super-fast digital pulse; pin 5 is the C040STROBE line, which can pulse twice as fast as the other digital outputs. If you choose that for your CLOCK pin, the FastLED6502 code automatically shifts into high gear, and you get faster performance. FastLED proper does this, too, in a much fancier way; it’s amusing that ‘little’ FastLED6502 does some of this, too.
The Code
https://github.com/FastLED/FastLED/blob/FastLED3.1/extras/FastLED6502.s65And here’s the RainbowDemo.s65, as shown in video:
https://github.com/FastLED/FastLED/blob/FastLED3.1/extras/RainbowDemo.s65
This is Crazy
Iteration impels improvement.
Posted: July 19, 2014 Filed under: Uncategorized Leave a commentThis thing that I am casually holding up in one hand is an 7′ x 3′ LED tapestry, plus diffuser, plus controller box, plus all mounting hardware, plus power supply and extension cord (rolled up inside for easy transport). It’d fit in the carrying bag for a folding camp chair.

Now, truth be told, I’m not crazy about the layout of LEDs on it (too gridular)…

…so there will be at least one more iteration of this “small” one before I build the “big one” for playa. But. It feels good to have come this far: the previous incarnation had to be wheeled around in a suitcase, and required complicated mounting due to it’s own weight.
Next iteration will focus on making the layout more ‘organic’ (the way I like it), and continuing to rethink how the diffuser is held at the right distance from the light.
Lanyard-mountable LED throwies
Posted: May 25, 2014 Filed under: DIY, Explorations, How-to, That Totally Worked, Uncategorized | Tags: blinky, DIY, glow, glowy, invention, inventions, LED, LEDs, light, throwies, toys Leave a commentAt the last “HacKidThon”, we showed a passel of kids how to make LED “throwies”. Each one is a nothing more than an LED, a coin cell battery, and a magnet so the contraption can stick to metal surfaces, walls and buildings, and hang there glowing.
This week, someone asked me if we could modify the classic design somehow so that the LEDs could be attached to lanyards, instead of magnets. We wanted it to be as cheap and easy as the rest of the “throwie” recipe.
A little brainstorming with Eleanor, and we came up with this: plastic-coated paperclips!

The paperclips actually help hold the LED leads in place; we put tape around them as usual, though that’s not shown in the picture. The plastic coating keeps the paperclip from shorting out the positive and negative battery terminals.
The coated paperclips cost less than a penny apiece, and come in colors that match the LEDs. Victory!
Easter Egg Hunt Rules, 2014.
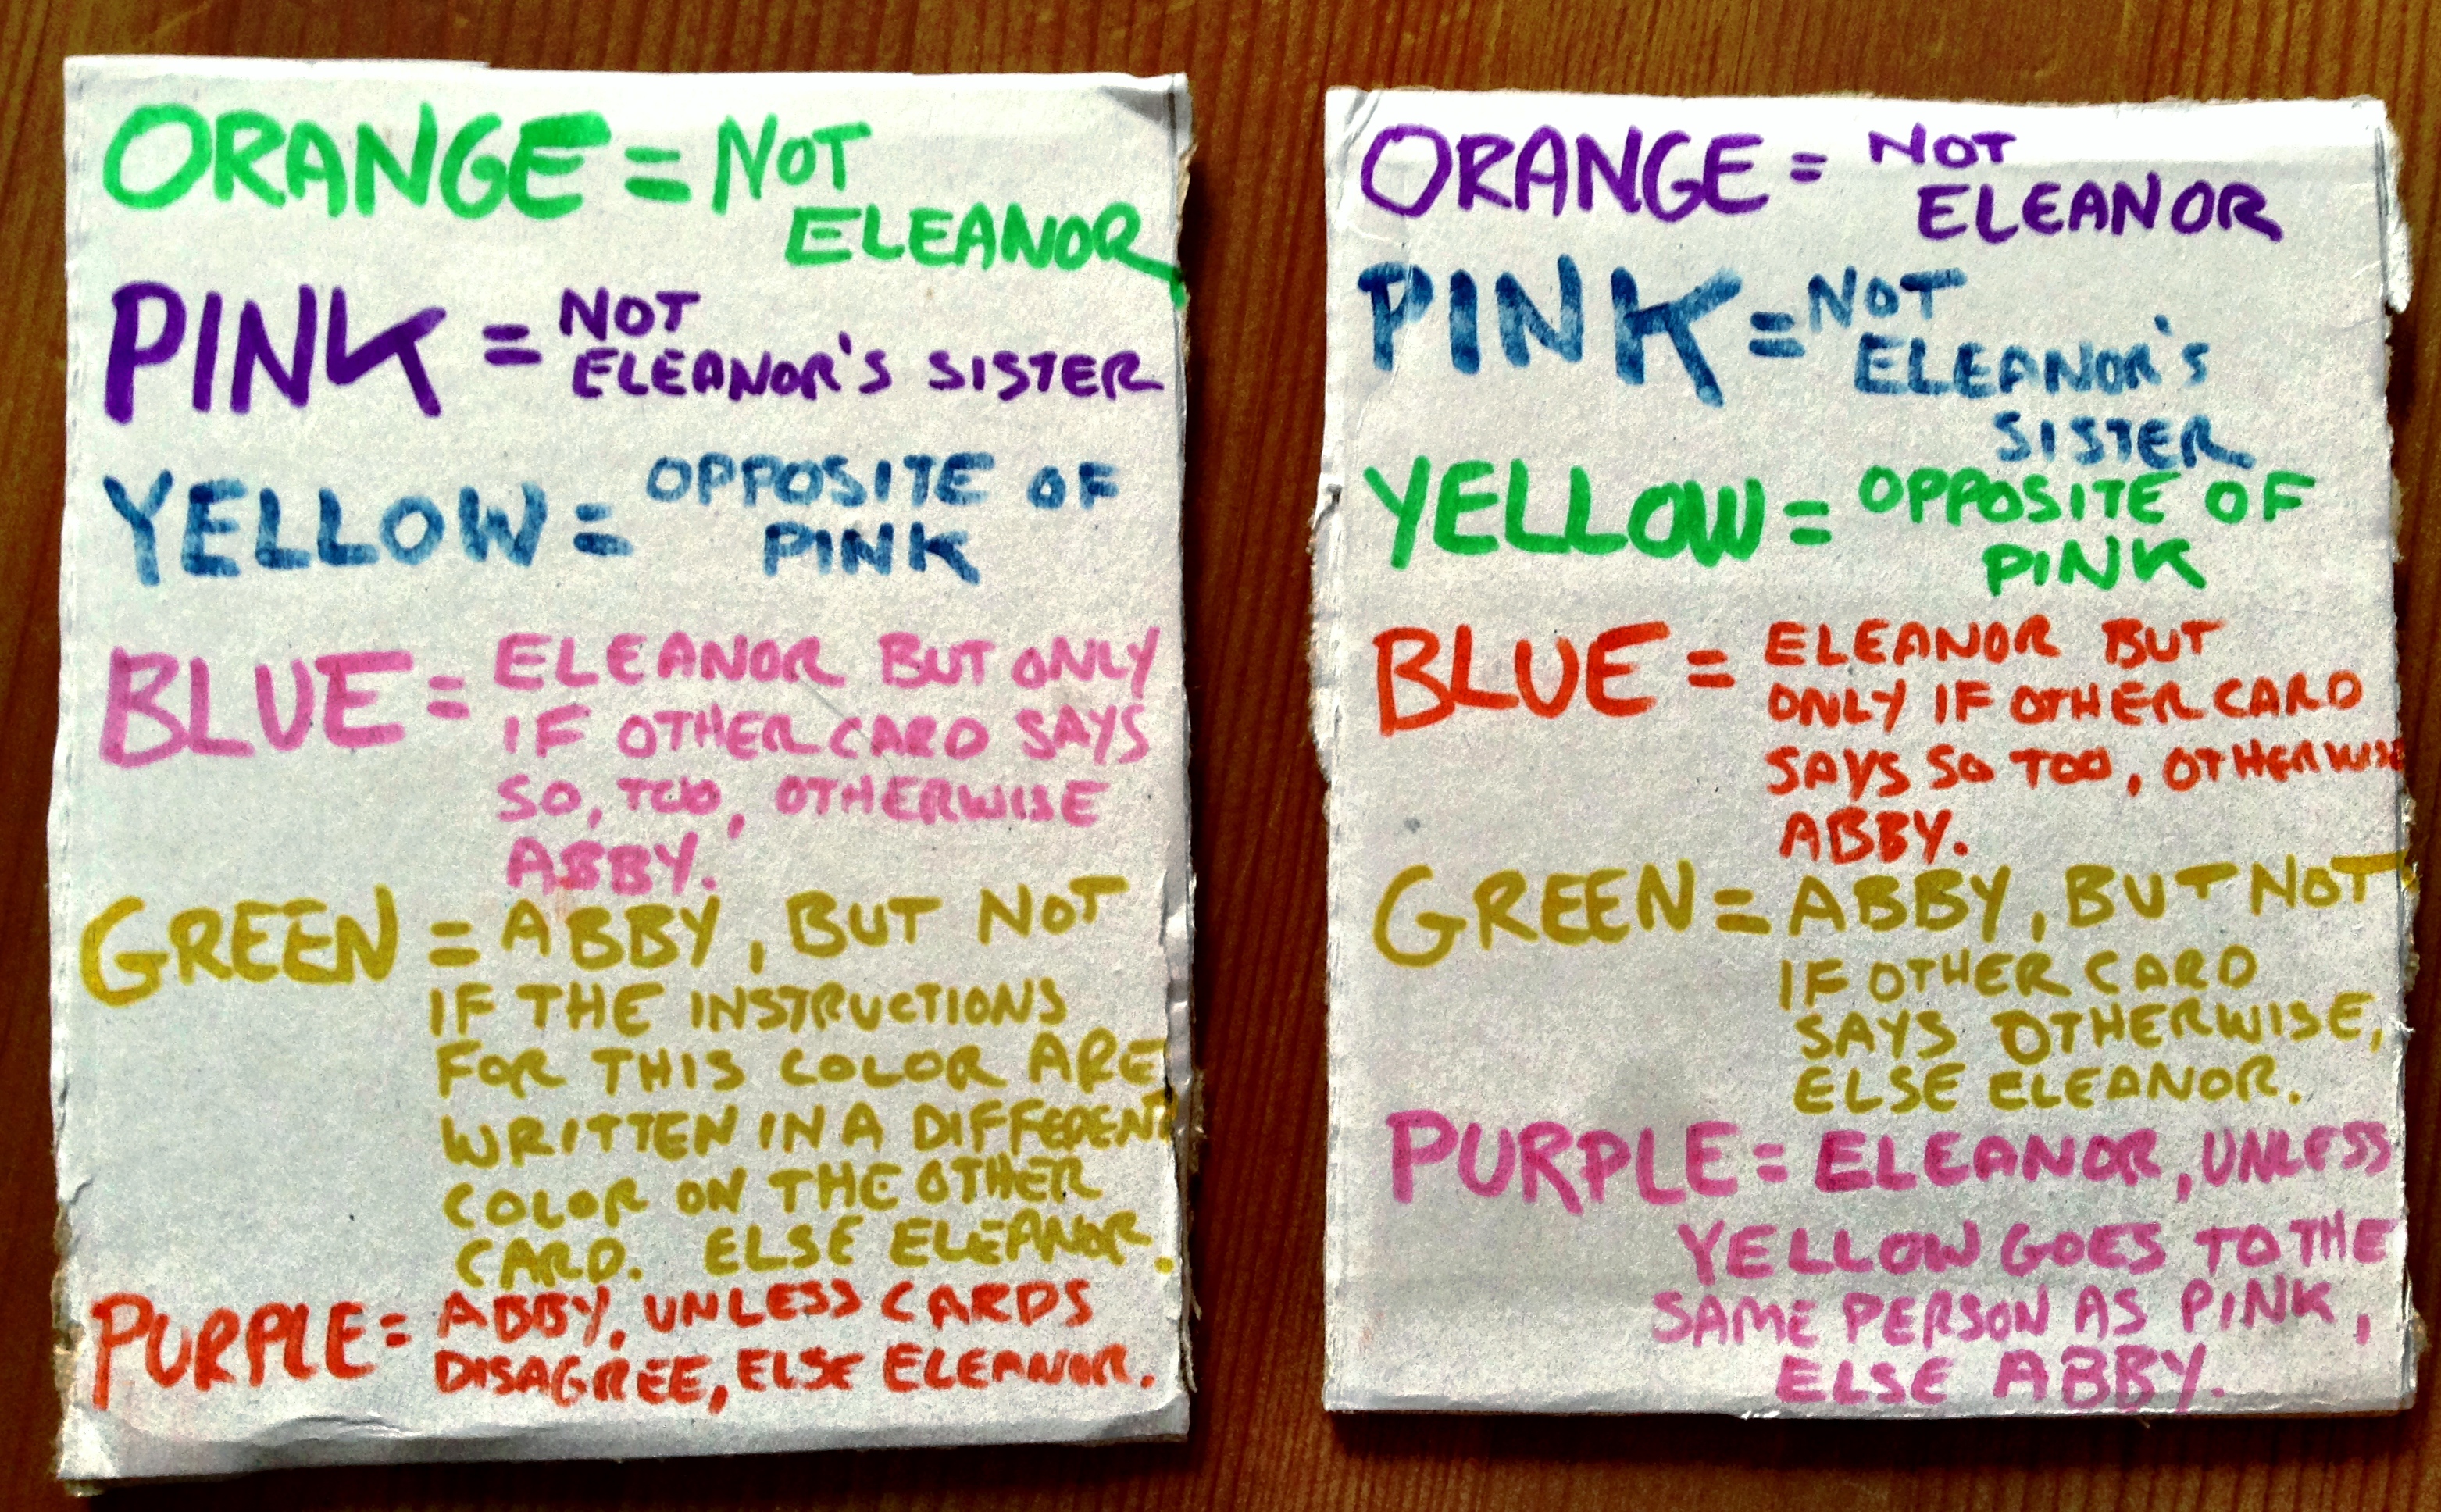
Posted: April 21, 2014 Filed under: Coding, Explorations, Getting A Clue, That Totally Worked | Tags: Easter, easter egg hunt, easter eggs, puzzle, puzzle hunt, puzzles, rules 5 CommentsWe love doing Easter egg hunts. But as the girls get faster, smarter, and more wily, merely finding the eggs is no longer challenge enough. I’ve gotta slow ’em down somehow, and this is how I do it: each girl gets an empty basket (I use traditional Jack-O-Lantern baskets), and sheet of instructions helping her know which eggs are for her, and which are for her step-sister. Each year, the instructions require more careful reading and invoke increasingly complicated rules.
New this year: the contents of two of the eggs altered the interpretation of rules, retroactively. This fact itself was part of the published rules… this time.
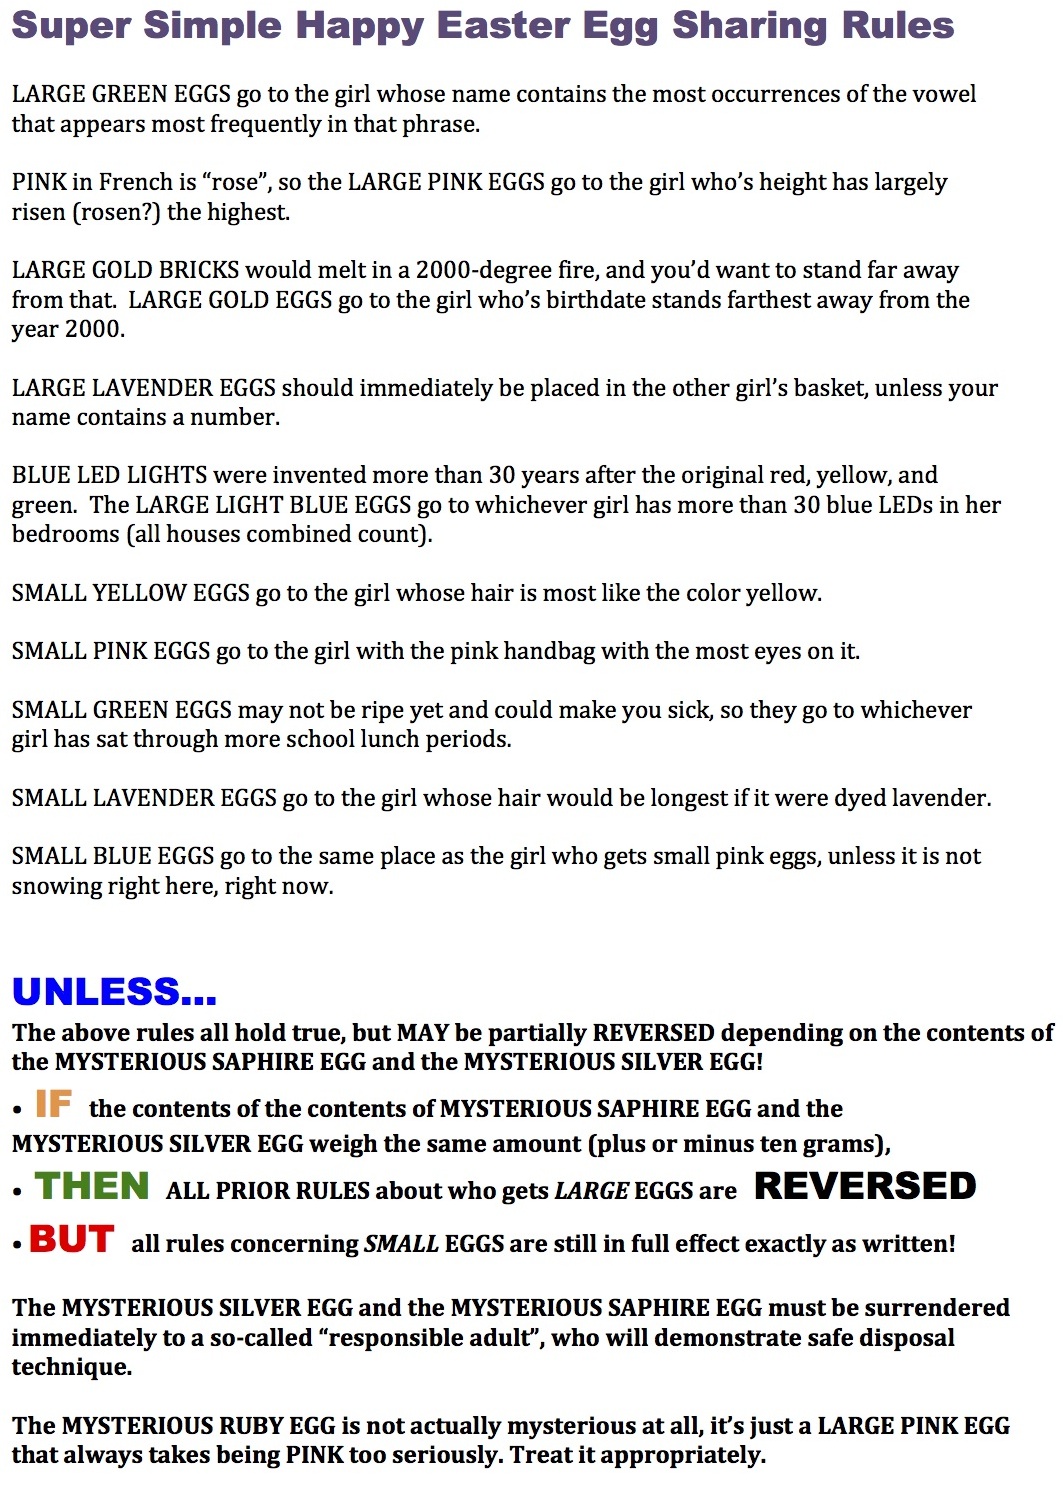
The best part was watching the girls excitedly pounce as they found the first eggs, and then stall completely as they had to stop and puzzle out exactly who’s egg it actually was that they’d just found.

-Mark
P.S. Here are the previous year’s Egg Hunt Rules (2013):
Fire2012: an open source fire simulation for Arduino and LEDs
Posted: April 4, 2014 Filed under: Art, Coding, Creations, DIY, Explorations, How-to, That Totally Worked | Tags: arduino, art, blinky, DIY, fastled, fiery, fire, glow, glowy, LED, LEDs, light 3 CommentsI’ve built and programmed a couple of different ‘fire’ simulations for Arduino and LEDs, and I’ve had numerous requests over the years to share the source code. I’ve always been happy to share my work; the holdup has been that before I share my code for the world to peer at, I like to clean it up a little. I like to give the code a clean shave and scrub under its fingernails before it steps out onto the wide open Internet where it might have an audience with Her Royal Majesty, The Queen of England. It could happen.
Anyway, I finally cleaned up the code for one of my simplest and most legible ‘fire’ simulations, and I give it to you, your Majesty, and everyone else, too. Here’s a video of the code in action on a 30-pixel strip of WS2812B LEDs (or maybe WS2811) and an Arduino. Source code link is below the video.
Full source code is here: http://pastebin.com/xYEpxqgq The simulation itself is only about 25 or 30 lines of code. It uses our (open source) FastLED library to drive the LEDs.
Discussion about the code and how to port it and use it are here on the FastLED discussion group on G+ https://plus.google.com/112916219338292742137/posts/BZhXE4cqEN4
Enjoy!
-Mark
If I’m confused, it must be playtime.
Posted: March 20, 2014 Filed under: Art, Coding, Creations, Explorations, Reflections, So that didn't work, That Totally Worked | Tags: arduino, fastled, learning, LED, LEDs, play Leave a commentSome things we try because we have a clear idea where we want to be and a clear idea how to get there.
Some things we try because we’re suddenly shocked to find that the heretofore completely impossible has suddenly and surprisingly come within practical reach.
And some things we try just to play, and to explore what if. We start with our heads full of simple ideas that turn out to be wrong, and we awkwardly replace them in torn out bunches with new confused half-understandings that, later, will let us reach something wholly unexpected.
I’m not sure which of these things in doing here, which means it’s probably that last one.

Running 2 Amps of LEDs through an Arduino Nano
Posted: February 25, 2014 Filed under: Coding, DIY, How-to, That Totally Worked | Tags: amps, arduino, blinky, fastled, hack, hacks, LED, LEDs, nano, power, USB 2 CommentsThe Arduino Nano provides up to 0.5 Amps of regulated +5v output, on it’s “+5V” pin, which can drive between 10-30 addressable LEDs, depending on your chosen brightness and animation patterns. Even if you connect a 2 Amp USB power supply (e.g. an iPad charger), the Nano’s little voltage regulator will overheat if you try to draw more than 0.5 Amps from the “+5V” pin on the Arduino.
However, you can ‘tap’ the pre-voltage-regulator power traces on the Nano’s circuit board, and drive 2 Amps of LEDs (over 100) ‘through’ the Nano, and do it in a way that keeps your wiring simple. Basically, you can find the places on the Nano’s board where the raw USB power connections are exposed, and tap into them there.
WARNING!
MODIFY, MISUSE, AND DESTROY YOUR ARDUINO AT YOUR OWN RISK!
DANGER! FIRE! RUN!
But, OK, if you wish to continue…
1. Flip the Nano over so you’re looking at the bottom side.

2. The unfiltered, unregulated +5 signal from the USB port is available on the board near the base of the D2 pin. Carefully solder a wire (red, for +5v) directly to the exposed component pin on the circuit board.
3. A convenient companion GND connection can found on the center pin of the power regulator itself. Solder a wire (black, for ground) to this pin.
4. By powering your LEDs from these direct-power traces (and thus directly from the USB power source), instead of through the Nano’s half-amp-max voltage regulator, you can drive up to about two Amps worth of LEDs, provided that you plug the Nano into a 2 Amp USB power adapter.
I’ve used this technique in probably six or eight Arduino Nano projects, and nothing’s caught fire (yet). With a little probing around, you can also find similar ‘hacks’ for other models of Arduino, e.g., the Uno, Leonardo, etc., but since power is handled differently on each board, you’ll have to figure it out differently for each board design.
Good luck!
What Dark, Light, and Solstice mean to an LED art hacker
Posted: December 21, 2013 Filed under: Art, Reflections | Tags: art, LEDs, light, solstice Leave a commentWe celebrated the winter solstice last night with friends and laughter. I wore a little pin with a circle of LEDs on it, animating a cycle of light and dark.

I think that for lightbenders (LED art hackers) like me, like us, the winter solstice is actually a bit of a mixed blessing; I’m as eager as the next guy to start the slow journey back toward warmer weather, but given than our LED creations thrive in darkness, the arrival of the winter solstice means there will be fewer hours of darkness each night to illuminate with our creations.
Likewise the summer solstice marks the start of the shift away from the happy-go-lucky light-out-past-dinner-time days, but it also brings promise of a winter’s beautiful dark canvas, which we’ll light with our love and our craft.
Have a bright beautiful solstice, everyone. And if you keep your calendar that way, Happy New Year!
Optimizing 10 lines of Arduino code: You’re wrong, so am I.
Posted: December 1, 2013 Filed under: Coding | Tags: arduino, ATmega, Atmel, AVR, avr-gcc, Coding, gcc, optimization, performance, programming, size, speed 18 CommentsI’m going to show you a simple ten-line Arduino function, and how through surprisingly confused experimentation I was finally able to make it 40% smaller and nearly twice as fast. Along the way, you’ll see how not only were some “generally accepted” intuitions about efficiency misguided, but my own instincts and intuitions about how to improve things were no better! But when I hit something that I didn’t understand, or that surprised me, I kept digging, even if it confused me. A lot. Which it did.
Oh, and I should say this at the outset: none of what you’re about to see today requires reading “machine code”. Reading machine code can be incredibly helpful sometimes in cases like this, but today I’m going to show you what you can do just looking at the size of the executable. All you’ll see here is a ten-line function in plain C, compiled for Arduino/AVR which is a simple 8-bit CPU, and the code sizes reported by the Arduino IDE. It’s an illustration, I hope, of the idea that what matters in performance optimization is the general approach, not the particular tools you use.
The “dirty laundry” disclaimer
I usually do these sorts of performance optimization tear-downs on my own code, and I feel pretty comfortable dumping my own dirty laundry out on the table for illustrative purposes. But this time I’m starting with a snippet of code I found on-line, and I’m a little tentative about this: it’s sort of every open-source developer’s nightmare, having their code picked apart by someone else for no good reason. So let me be perfectly clear: this post is not a critique of the original code; the original code, as posted, was already much faster than it needed to be. The performance surprises came from what the compiler was generating, and even then only when I scaled up from a “20 LED” project to a thousand-LED project. Fully scaling everything up requires a lot of rethinking, but this one function is an interesting case by itself.
If anything, this post is just a reminder that we should all be mindfully humble and presume that sometimes our instincts about code size, speed, and efficiency are completely wrong, or at least surprisingly misguided.
OK, ’nuff said. On to the code.
The Code
So here’s the code I saw today. It takes an LED index (from 0-19) and the position of a glowing ‘thing’ (also from 0-19) and returns a brightness to use for this LED from 1 (dim) to 32 (bright). If the ‘thing’ is at the same position as this LED, this LED should glow brightly. If the thing is further away, this LED should only glow dimly. Here’s the original function:
uint8_t brightness_1( const int8_t led, const int8_t pos) {
  switch (abs(led-pos)) {
    case 0: return 32;
    case 1: return 16;
    case 2: return 6;
    case 3: return 2;
    default: return 1;
  }
}
It’s compact, legible, and probably pretty efficient, I thought. I checked by compiling it, and on AVR, this source compiles to roughly 80 bytes, which is about 40 machine code instructions.
Wait. What?!? 40 instructions?! What the heck is it doing?!? Advanced calculus? All the variables are one byte (single register) each, the function is doing only two simple, simple things: one trivial absolute value calculation, and a few conditionals! What’s the compiler doing, I wondered? Forty instructions seemed like way too many, and I decided to investigate.
Baby Steps
Just as a reality check, I re-wrote the function in what I call “baby steps C”: each small step of the code written out one small piece at a time. It can help understand what the function is actually doing.
uint8_t brightness_2( const int8_t led, const int8_t pos) {
  // Absolute value, by hand
  int8_t diff;
  diff = led - pos;
  if( diff < 0 ) {
    diff = -diff;
  }

  // Conditionals, by hand
  if( diff == 0) return 32;
  if( diff == 1) return 16;
  if( diff == 2) return 6;
  if( diff == 3) return 2;
  return 1;
}
This code compiled into just 42 bytes, around 21 instructions. Smaller. Way smaller. OK, so what’s up, gcc?
Well, as noted, the code only really has two parts: the absolute value caluclation, and the conditionals, so I was pretty sure that the bloat was coming from one of those two things.
gcc ” : – P ” switch
Now I know from prior experience that particularly on AVR platforms (like Arduino), gcc really hates to create a “jump table” out of a switch statement; it almost always turns a switch into a series of “if” and “goto” statements. It turns out on AVR that’s actually often faster and smaller than a jump table, so gcc is actually often making the right choice in these cases. But if gcc is turning the “switch” in the original into a series of “if”s and “goto”s by itself anyway, why is the second version so much smaller (and faster)?
I decided to try this: do the ‘abs’ by hand, but use leave the switch in place:
uint8_t brightness_3(const int8_t led, const int8_t pos) {
  // Absolute value, by hand
  int8_t diff;
  diff = led - pos;
  if( diff < 0) diff = -diff;

  switch (diff) {
    case 0: return 32;
    case 1: return 16;
    case 2: return 6;
    case 3: return 2;
    default: return 1;
  }
}
50 bytes, about 25 instructions. Basically “small” again. Maybe that call to “abs(…)” was the problem that was taking up all the space. I decided to confirm that simple hypothesis by switching back to the call to the abs(…) library function and checking the code size. I predicted, of course, that the code would go back to 80 bytes, more or less. I reinstated the call to abs(…) and changed the variable ‘diff’ to be unsigned, which is safe, as the result of abs(…) will never be negative.
uint8_t brightness_4(const int8_t led, const int8_t pos) {
  uint8_t diff;
  diff = abs( led - pos );

  switch (diff) {
    case 0: return 32;
    case 1: return 16;
    case 2: return 6;
    case 3: return 2;
    default: return 1;
  }
}
This version was 66 bytes. That was completely unexpected: it was neither large nor small. It was medium-sized, and completely confusing. My hypothesis that the “abs(…)” call was causing the size increase went right out the window. How was this code any different from the original 80 byte code?? It was calling abs(…), just like the original code, and it was using a switch, just like the original code. And yet, it was markedly smaller.
Well. Wait a minute. There actually were some differences. I had changed the type of ‘diff’ from signed to unsigned. I changed it back.
uint8_t brightness_5(const int8_t led, const int8_t pos) {
  int8_t diff;
  diff = abs( led - pos );

  switch (diff) {
    case 0: return 32;
    case 1: return 16;
    case 2: return 6;
    case 3: return 2;
    default: return 1;
  }
}
Size went up +6 bytes, to 72 bytes. OK, so: having ‘diff’ be a signed variable instead of unsigned was costing me a few instructions. But wait — this code was still eight bytes (four instructions) shorter than the original code, even though it was nearly identical!
If I put the “abs(led-pos)” back inside the switch, the size went back up to exactly where it started from: 80 bytes.
Desperate for anything to try next, I decided to split the difference with this odd combination: I moved the “abs(led-pos)” into the switch, but left the seemingly useless “diff=” in front of it.
uint8_t brightness_6(const int8_t led, const int8_t pos) {
  int8_t diff;

  switch ( diff = abs( led - pos ) ) {
    case 0: return 32;
    case 1: return 16;
    case 2: return 6;
    case 3: return 2;
    default: return 1;
  }
}
Back down to 72 bytes! If I took out the “diff=” it went back up to 80. Something about that assignment was changing how the compiler was seeing things.
For completeness, I tried changing the “int8_t diff” to an unsigned “uint8_t diff”:
uint8_t brightness_7(const int8_t led, const int8_t pos) {
  uint8_t diff;

  switch ( diff = abs( led - pos ) ) {
    case 0: return 32;
    case 1: return 16;
    case 2: return 6;
    case 3: return 2;
    default: return 1;
  }
}
And with that the code shrank six bytes again — even though the variable itself was never “used” after the swich statement. That was a rather odd and interesting clue: the variable wasn’t being used, but the type of the variable was making a difference in the code size!
Just my type
I decided to see if the type made a difference by itself.
Spoiler alert: changing the data type made ALL the difference.
To save space here, I’ll show you the three different variations and how big each one was:
uint8_t brightness_8(const int8_t led, const int8_t pos) {
//switch ( (uint8_t) ( abs( led - pos ) ) )  // 66 bytes
//switch ( ( int8_t) ( abs( led - pos ) ) )  // 72 bytes
  switch (           ( abs( led - pos ) ) )  // 80 bytes
  {
    case 0: return 32;
    case 1: return 16;
    case 2: return 6;
    case 3: return 2;
    default: return 1;
  }
}
What’s going on? Well, different data types take different amounts of work to wrangle. That makes sense. Smaller, simpler data types, like unsigned single bytes, take less work and fewer instructions. Bigger data types take more work, more instructions. When we tell the compiler to treat the result of the “abs(…)” expression as a single unsigned byte, it’s somehow taking “less work”. But less work than … what? What’s the data type that it’s defaulting to? Well, even without reading the machine code (and I promised I wasn’t going to do that), we can try an experiment. Again, I’ll save some space by showing the size of a few different variations at once:
uint8_t brightness_9(const int8_t led, const int8_t pos) {
//switch ( (unsigned int) ( abs( led - pos ) ) )  // 74 bytes
//switch (   (signed int) ( abs( led - pos ) ) )  // 80 bytes
//switch (          (int) ( abs( led - pos ) ) )  // 80 bytes
  switch (                ( abs( led - pos ) ) )  // 80 bytes
  {
    case 0: return 32;
    case 1: return 16;
    case 2: return 6;
    case 3: return 2;
    default: return 1;
  }
}
Based on this, I’m going to say that the default data type that the compiler is using for the result of the “abs(…)” expression is simply “int”. Now, I already knew in the back of my mind that the ANSI/ISO “C” language spec says that the data type of arithmetic expressions is, by default, “int”, but I wasn’t thinking about it here. I deal with compiler internals for a living, so knowing some of the quirks of the ANSI/ISO “C” language spec is merely an occupational hazard. But it’s also interesting to see that you can more or less derive the type that the compiler is using just from the executable size, and some experimentation.
OK, so what? Weren’t we trying to make this code smaller and faster? Yes. So, let’s do that right now. We know that expression data types are defaulting to “int”, which on Arduino is a 16-bit data type, and since it’s running on just an 8-bit platform… regular 16-bit “int” is slow. And big. Let’s fix it.
There are two expressions in the function that don’t have an explicit type: the result of the “abs(…)” call and the argument inside the “abs(…)” call. Let’s give each of those expressions and explicit type, using single byte types for everything:
uint8_t brightness_10(const int8_t led, const int8_t pos) {
  switch ((uint8_t)( abs( (int8_t)(led - pos) ) ) )
  {
    case 0: return 32;
    case 1: return 16;
    case 2: return 6;
    case 3: return 2;
    default: return 1;
  }
}
Save, recompile, and… it’s down from 80 byte (about 40 instructions) to 56 bytes (about 28 intructions), just by explicitly specifying data types that are CPU-native.
This, right here, is the point where I felt like I could declare a victory: the new generated code is 30% smaller (and, in this case, faster), we didn’t have to make any radical changes to it, and the code is approximately as maintainable as it was when we got here. Plus, at long last, I had a clue about what was making the code so apparently bloated in the first place: it was using 16-bit “int”s all over the place simply because it hadn’t been told to use 8-bit data types.
Looking at this, one might make an intuitive assumption that since all the input data types were 8-bit, that the computations and comparisons would all be efficiently 8-bit, too. Nope. That ‘intuition’ would be just wrong.
Now you may recall that the “baby steps C” version was only 42 bytes, making it smaller (and most likely faster) than the 56 byte version we have above. Even now that we’ve gotten our data types all lined up as 8-bit values, why is the compiler generating bigger code than for our “baby steps C” version?
Ripped abs
Let’s try substituting our own hand-rolled absolute value function, but leaving the switch statement.
uint8_t brightness_11(const int8_t led, const int8_t pos) {
  int8_t diff;
  diff = led - pos;
  if( diff < 0 ) diff = -diff;

  switch ( diff )
  {
    case 0: return 32;
    case 1: return 16;
    case 2: return 6;
    case 3: return 2;
    default: return 1;
  }
}
A little smaller: 50 bytes (25 instructions). I’m guessing here that “abs(…)” is defined to take a 16-bit int, and that it’s promoting the 8-bit value to 16-bit, caluclating the absolute value, and return it as 16-bits. Our hand-rolled absolute value computation keeps everything as 8-bit values, which is probably why it’s smaller. If we were reading machine code today, we could check, but we aren’t, so for now we’ll just move forward.
Throw the switch
Next let’s focus on testing to see if the “switch” versus “if”s makes a difference.
uint8_t brightness_12(const int8_t led, const int8_t pos) {
  int8_t diff;
  diff = led - pos;
  if( diff < 0 ) diff = -diff;
  // Using if's instead of a switch
  if( diff == 0) return 32;
  if( diff == 1) return 16;
  if( diff == 2) return 6;
  if( diff == 3) return 2;
                 return 1;
}
42 bytes (21 instructions) using hand-written “if”s versus 50 bytes (25 instructions) before with the switch statement. This is another one of those times where “widely accepted knowledge” and the ensuing intuitions go right out the window. We’re taught in school, and it’s ‘commonly accepted as true’ that (1) switch statements compile down into a “jump table”, not a collection of “if”s and “goto”s, and (2) that the resulting code is both faster and more efficient than a chain of simple hand-written ‘if’ statements. And you know what? Neither one of those widely-held beliefs is universally true.
The “myth of super-efficient switch statements” is particularly unlikely to be true if you have a relatively small number of cases (e.g. say, fewer than 15?) in your switch statement. The exact ‘cutoff’ number varies from platform to platform and compiler to compiler, but if you have only five cases like the code we’re looking at here, I’d bet a nickel that most compilers would emit machine code that’s basically a collection of “if”s and “goto”s instead of a jump table. And that means that a simple set of hand-written “if”s can potentially produce smaller, faster code. In this case, it looks like that’s exactly what’s happening.
At this point, I suspect the code is about as small as we can make it without getting into assembly language or (worse) C code that veers into unsupported/unspecified language issues. Again, this is a great point at which to declare a victory.
And while we may not be able to make the code any smaller, we can almost certaintly make it faster by putting the most common code path first in the set of “if”s.
First things first
Since there are seven special values that the delta between ‘led’ and ‘pos’ might have that need special handling (-3, -2, -1, 0, 1, 2, and 3), and a much larger number of values (everything else) for which we just want to return “1”, we should put that test first:
uint8_t brightness_13(const int8_t led, const int8_t pos) {
  int8_t diff;
  diff = led - pos;
  if( diff < 0 ) diff = -diff;

  // test for the most common case first
  if( diff > 3 )  return 1;
  // then handle all the more special cases
  if( diff == 3)  return 2;
  if( diff == 2)  return 6;
  if( diff == 1)  return 16;
  /* diff == 0 */ return 32;
}
This code is also 42 bytes (21 instructions) long, but it most cases, it’ll only have to execute two “if” statements (one in the absolute value computation, and one to see if ‘diff > 3’) before being able to tell what value to return (‘1’). This compares very favorably with the previous code arrangement, where the most common case was actually listed _last_.
If the common case occurs about two thirds of the time, and the other cases make up the other one third of the time all together, this code reordering results in nearly a 2X speedup in just this one function.
If every switch statement turned into a jump table every time, the order of the cases wouldn’t matter. But as we’ve seen, switch statements don’t turn into jump tables all that often; they turn into a collection of “if”s and “goto”s, and when that happens, the order of the cases actually does matter a fair amount. Again, the “intuitive understanding” of what the machine code is actually doing turns out to be way off base.
Intuitively wrong
So there you have it. A ten-line Arduino C function dissected, and reassembled into code that’s both smaller and faster, without being substantially more difficult to maintin. And along the way, we discovered that not only several “well known” intuitions about speed and code size not entirely correct, but that as I tried to figure out what was going on, my intuitions came up wrong a couple of times, too!
“Performance tuning” is called that for a reason, instead of being called “performance guessing.” You establish a metric (like, in this case, mostly just code size), and work on optimizing it through hypothesis, testing, and frequent error. Along the way, you have to make theories about what’s going on, test them, and be willing to say that your guess was wrong, or that you’re just really confused. And when that happens, you have to push forward. This is the key thing. No matter how confusing things get, you have to keep your wits and really work to gain and understanding that, ultimately, you can use to make your code really sing.
Thanks for your time; I hope you found it interesting, useful, and fun.
-Mark
Hoop skirt — made with real hoops!
Posted: October 15, 2013 Filed under: Art, Creations, DIY, Explorations, How-to, That Totally Worked | Tags: costume, costuming, dress, duct tape, eak, eleanor, hoop, hoop skirt, hula hoops, skirt Leave a commentEleanor and I spent this weekend working on her Halloween costume. Part of what she planned was a ‘hoop skirt’, but as you can imagine no commercially available hoop skirt met her exacting standards of design and quality — and also my exacting budgetary requirements. Naturally, we decided to take the DIY route! And, we pondered, what goes into a hoop skirt? HOOPS, obviously!
We picked up a used dress at The Garment District (our local vintage/costume/cheapo clothing mecca), a set of three hula-hoops, and some leopard-print duct tape. The smallest hula hoop became the bottom (largest) hoop for the skirt; the other two had to be dramatically resized smaller (via pliers, dremel, duct tape). We started construction from the waist down, with a nylon web belt with a parachute snap buckle. From there, we hung each hoop with repositionable blue painters tape, and balanced each one until it was level. Then Eleanor secured each hoop in place at the right height with duct tape.
And presto! A hoop skirt made with real hoops! (and duct tape, of course!)

