Running 2 Amps of LEDs through an Arduino Nano
Posted: February 25, 2014 Filed under: Coding, DIY, How-to, That Totally Worked | Tags: amps, arduino, blinky, fastled, hack, hacks, LED, LEDs, nano, power, USB 2 CommentsThe Arduino Nano provides up to 0.5 Amps of regulated +5v output, on it’s “+5V” pin, which can drive between 10-30 addressable LEDs, depending on your chosen brightness and animation patterns. Even if you connect a 2 Amp USB power supply (e.g. an iPad charger), the Nano’s little voltage regulator will overheat if you try to draw more than 0.5 Amps from the “+5V” pin on the Arduino.
However, you can ‘tap’ the pre-voltage-regulator power traces on the Nano’s circuit board, and drive 2 Amps of LEDs (over 100) ‘through’ the Nano, and do it in a way that keeps your wiring simple. Basically, you can find the places on the Nano’s board where the raw USB power connections are exposed, and tap into them there.
WARNING!
MODIFY, MISUSE, AND DESTROY YOUR ARDUINO AT YOUR OWN RISK!
DANGER! FIRE! RUN!
But, OK, if you wish to continue…
1. Flip the Nano over so you’re looking at the bottom side.
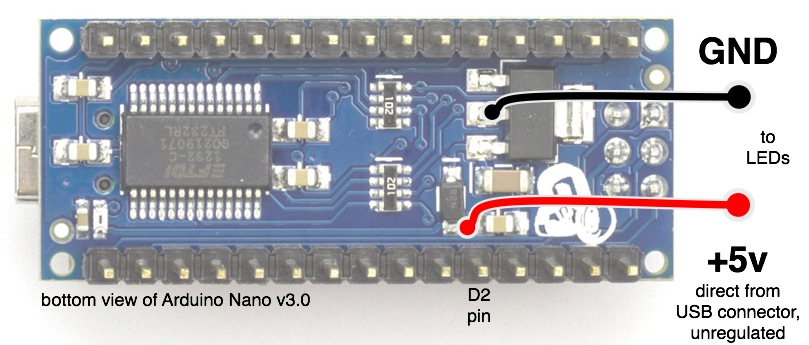
2. The unfiltered, unregulated +5 signal from the USB port is available on the board near the base of the D2 pin. Carefully solder a wire (red, for +5v) directly to the exposed component pin on the circuit board.
3. A convenient companion GND connection can found on the center pin of the power regulator itself. Solder a wire (black, for ground) to this pin.
4. By powering your LEDs from these direct-power traces (and thus directly from the USB power source), instead of through the Nano’s half-amp-max voltage regulator, you can drive up to about two Amps worth of LEDs, provided that you plug the Nano into a 2 Amp USB power adapter.
I’ve used this technique in probably six or eight Arduino Nano projects, and nothing’s caught fire (yet). With a little probing around, you can also find similar ‘hacks’ for other models of Arduino, e.g., the Uno, Leonardo, etc., but since power is handled differently on each board, you’ll have to figure it out differently for each board design.
Good luck!

Correct me if I am wrong, but according to the Arduino Nano’s schematic, the on board regulator is not used while plugged into USB. What over heats is the Schottky diode in series with the USB Power which is rated to only 0.5A. Your hack solves this problem with bypassing the current around diode but not the regulator.
Couldn’t you just follow that trace to it’s source – the USB plug itself – and solder your jumper there (just behind where the USB connector’s soldered onto the Arduino)?
The advantage would be, you’re not pulling 2A through the PCB, which isn’t rated for such current (despite your success, this is going to be hit or miss for someone). Better still to hack the cable, or hack a USB micro M to USB micro F “pass through” so you have a place to tap the juice.
That said, I’ll try this, but I feel like it should be supervised (and not used in the context of, say, powering a christmas tree with ws2812s on full power white…)